Installing Fan-Tastic Roof Vent on GMC Vans

Murraycroexp

Veteran Expediter
Re: Installing Fan-Tastic Roof Vent On Cargo Vans

We lets see if its cool. I need now those materials to go with.

You need a mats list? Here's mine.

5000RBT fan.
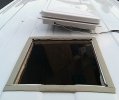
Jigsaw with fresh metal blade.
Painters tape, to mask off hole and protect paint during cut.
Sharpie to mark hole.
Tape measure.
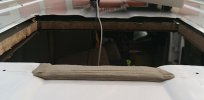
Putty tape, 3/4"-1" wide.
During caulk.
Caulk gun.
Roll of primary wire to feed power to fan.
Self tapping metal screw to ground the negative side of the power feed.
Ladder, stepstool, extension cord.

I think that's about all I used. This was my first time installing one of these. Although I'm pretty handy, I was nervous about cutting that big a$$ hole in my roof. But it went great!!
 

Murraycroexp

Veteran Expediter
Re: Installing Fan-Tastic Roof Vent On Cargo Vans

And that should have said "Dicor caulk". Ask for it by name. I got mine at an RV place in Joplin that just happened to be en route to my drop.
 

21cExp

Veteran Expediter
Re: Installing Fan-Tastic Roof Vent On Cargo Vans

We lets see if its cool. I need now those materials to go with.

Your profile indicates you are a writer and business person...are you also expediting and have a vehicle in which to carry loads?

If so, best of luck with your roof vent installation. The how-to above should help greatly and there are plenty of people here to answer any questions you may have.
 

Murraycroexp

Veteran Expediter
Re: Installing Fan-Tastic Roof Vent On Cargo Vans

Yes, 21cExp's tutorial helped me tons!! Read it and understand it fully before you start and you should have great results. I did and I have a leak free and damage free setup!!!
 

sirgregory46

Expert Expediter
Re: Installing Fan-Tastic Roof Vent On Cargo Vans

Definitely will help but I think I am going to put in the max fan with the auto hood. all the basics should be the same. Atleast now I know how to fill in the channels :)

Sent from my DROID BIONIC using EO Forums mobile app
 

sirgregory46

Expert Expediter
Re: Installing Fan-Tastic Roof Vent On Cargo Vans

This is the one I am talking about maxx fan 75001370893462386.jpg

Sent from my DROID BIONIC using EO Forums mobile app
 

21cExp

Veteran Expediter
Re: Installing Fan-Tastic Roof Vent On Cargo Vans

This is the one I am talking about maxx fan 7500View attachment 7004

I looked at that one too. Was my first choice, actually, but ended up going with what I did, which is the Fan-tastic 6000RBTA (links in the first post), because I had more options to choose from through the dealer. Like low or high profile base, choice of flat or domed vent covers, colors, etc, and that I could pre-order the interior garnish cut to the height I wanted. Also a lot of quickly answered email support.

All of which made my installation and end result exactly like I wanted, and so I could still go through my fav Mr Clean car wash.

Keep us in the loop on how it goes installing it, and post back here with pics so others can see it, too.
 

Murraycroexp

Veteran Expediter
Re: Installing Fan-Tastic Roof Vent On Cargo Vans

This is the one I am talking about maxx fan 7500View attachment 7004

Sent from my DROID BIONIC using EO Forums mobile app

Looks cool. I do like the low profile of my FF. I slept in a Walmart parking deck in Atlanta a few miles from my drop a couple of weeks ago. I only had a few inches to spare. I also am fond of the low amp draw of the FFs. But Maxair may be low too.
 

sirgregory46

Expert Expediter
Re: Installing Fan-Tastic Roof Vent On Cargo Vans

The reason I like this one it will go flat to. I will hope to get in in the next month or two. Will post when done. Thanks again for the info.

Sent from my DROID BIONIC using EO Forums mobile app
 

21cExp

Veteran Expediter
Installing Fan-Tastic Roof Vent On Cargo Vans

There's been a lot of conversation, and a bit of consternation, both here and on other forums about DIY installation of a roof vent in wide-ribbed roofs like on the GMC/Chevrolet and Ford cargo vans.

I've seen people go to great lengths to raise platforms or add metal panels or fiberglass etc to provide an even flat surface on which to install a roof vent so they don't have to deal with the high and low spots of a ribbed roof. None of that is really necessary if you follow the vent manufacturer's simple instructions and use some simple, common, sense.

I installed a Fan-Tastic 6000RBTA recently in my GMC van and documented the process. All images below are clickable to view the larger size.

Special thanks to Moot for reminding me of the Adohen Supply Co. website, from which you can order a variety of Fan-Tastic roof vents in various configurations (flat or dome lid in various colors, high and low profile bases, vent lock, etc). You can also add your roof thickness measurements to help ensure a better fit and less hassle in installation of the interior garnish.

As of this writing (May 2013) Adohen no longer stocks the fans in-house but sends your order directly to Fan-Tastic (who evidently does not sell directly to the public) along with any special dimensions, requirements, and add-ons. Scott, at Adohen, is a good guy to deal with, with fast response to any email inquiries.

If ordering from most suppliers other than Adohen, you pretty much get what they have in stock and have far less choice as to flat or dome, color of lid, depth of interior garnish, or lid lock, etc. You can find out more about all this on Adohen's Pictures and Dimensions page. Scroll down for the additional info.


View attachment 6808
I chose the flat lid instead of the more typical dome, as well as the low-profile base and lid-lock, because I like the lower overall profile and will be able to still take my van through my favorite car wash, as well as get into more parking garages than I might otherwise. I'd advise, though, to know your exact overall height before entering a parking garage.

You can see the interior garnish still in the box in the image above. Having carefully measured my roof thickness--from interior ceiling through insulation to van roof--I was able to order the garnish pre-cut to desired depth at no extra charge. Some have said cutting the garnish to the right height yourself is as much trouble as installing the whole vent.
(cont) Part Two: Installing the Putty and Cleaning Up...

View attachment 6826
Here's what I chose to bridge the gap and to put under the entire edge of the fan. Use putty tape for metal surfaces, and the butyl tape for fiberglass roofs. The package I bought from Amazon had 8', I think; more than enough. You can also purchase it at most good RV Supply stores. I threw aside the screws that came with the putty, too.

Doesn't really take that long to do, actually. Writing this post and trying to be clear with it, and the images, took longer than the install, to be honest. Probably three-four hours to install, without the picture-taking, if you're handy.

Hey old friends and new expediters!

Just checking back in from the road to say that after 6.5 years, the roof vent I installed in this How-To has never leaked and has not needed any maintenance or repairs as far as being re-caulked or re-sealed or anything. It's been through all sorts of weather from northern Quebec to the far west Texas borderlands desert for months on end, and has been scrubbed, car-washed dozens of times and gone down the highway open, and no leaks, no problems, no hassles.

Regarding automated car washes: If you plan on running your rig through car washes, I'd install your vent like mine, so it opens towards the rear with hinge towards the front. That way the top brush won't stress the lid, as they generally rotate from front to back. I run it through the fancy P&G car wash in Mason OH whenever I go through SW Ohio and just tell 'em "Leave the top brush working!" so the top of my van gets scrubbed. Hasn't hurt the roof vent in the least.

Hope y'all are doing well.

Dry roads and open skies to everyone.
 

Moot

Veteran Expediter
Owner/Operator
I looked to see who resurrected this thread. I scrolled down and found the last posting was from the OP. How could that be? I looked at the date of the post. Dated today and only a few hours ago. Welcome back JP! Are you going to hang around for awhile?
 

21cExp

Veteran Expediter
Hey hey, Mr Moot! - I might peek in from time to time to see if anyone might be hanging around wherever I might be wandering, though won't be expediting.
 
  • Like
Reactions: Turtle

21cExp

Veteran Expediter
Hey hey, boys and girls!

Just checking in again on this fave old thread I wrote of how to install a roof vent/fan, and to let y'all know that my roof vent installation has been an unparalleled success.

It's been ten years now that it's been installed and I still have not had to do a thing to it. Still no leaks, still works well, still one of the best things I've done to my van for comfort.

I can see, though, from this image I just made, that it's time to redo the caulk around the exterior edge. The putty tape I used, that goes all the way around under the flat edge, however, is still good. I have no leaks anywhere. The caulk around the edge keeps the putty tape from drying out.

I'll probably peel and scrape back the caulk all the way around, check the putty under edge at the middle dropped section, and make a judgement then if I need to reinstall the whole fan with new putty or not. I suspect it will be fine.

See images below of how I originally installed the putty tape before installing and screwing down the fan. A good seal there is important.

- The putty tape I used and like a lot is included in the Camco Universal Vent Installation Kit with Putty Tape
- Here's the Dicor Lap Sealant I used, though you should be able to find it at any good RV dealer: Dicor Lap Sealant
- RV Roof Vents at Dometic: RV Roof Vents

Also see, for those interested, how I used my van for expeditions around North America, some as long as 8 months straight.

Hope everyone here is doing well, that you've weathered the ups and down of the last few years, and that you're out there having a good time and making money.

Dry roads and open skies to you all!


roofvent_230430-1000.jpg
 

Attachments

  • 0q-puttybridge01.jpg
    0q-puttybridge01.jpg
    78.1 KB · Views: 5
  • 0r-freshputty01.jpg
    0r-freshputty01.jpg
    92.3 KB · Views: 6
  • vannery-int_6042-900.jpeg
    vannery-int_6042-900.jpeg
    235.8 KB · Views: 7
  • padrens_1145-1000.jpg
    padrens_1145-1000.jpg
    329.3 KB · Views: 7
Last edited:
Top