Sprinter Bypass Filter Installation

RLENT

Veteran Expediter
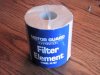
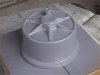
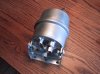
This is the modified Motor Guard M-30 Bypass Filter. Ralph (Wood) does a number of mods to them to make them suitable for use in lube systems as a bypass filter ...... one of the things he does is remove the epoxy paint that they come with from the factory (inside and out) - because the epoxy will soften over time when immersed in hot motor oil.

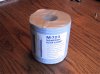
He normally spray paints the outside with silver metallic paint (as shown below) ......... I have to say that I wasn't too keen on his color selection - or the quality of the paint job. I'm sure it's fine, but the aesthetics left something to be desired. I suspect he would be more than happy to supply the units bare and unpainted.

I opted to strip mine and reshoot 'em.
 

Attachments

  • IMG_1522.jpg
    IMG_1522.jpg
    96.7 KB · Views: 40

RLENT

Veteran Expediter
Filter, Internal

Below is what the insides look like, along with the standard filter element that Ralph recommends :D 
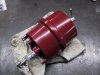
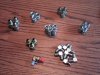
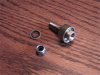
Some of the internals on a stock unit are plastic (polyproplene), because in an air filtration-only application they don't get all that hot internally - different story with lube oil, where the fluid temps could easily reach 250°F.

Ralph installs a restriction orifice (1/16" hole) in the inlet fitting to limit the flow (could actually be placed anywhere in the feed or return lines) This supposedly limits flow to around 8 quarts per minute when the oil/filter is hot (I've never measured it tho') It's surprising that they will flow that much, considering the oil has to pass from end of a roll of toilet paper to other.

Ralph also replaces the plastic internal components with CNC-machined metal parts, and substitutes different materials on the o-rings for the housing and the T-handle. He also pulls the retainer off the T-handle that captures it to the top half of the housing - so that you can lift the T-handle out after unscrewing it and allow air to enter, so that the unit will drain, as you are preparing to change the filter. (But for that to work you have to have the filter mounted higher than the oil sump so that gravity can do it's thing.)

That is one of the nicest features of this filter system - the ease with which one can change the filters. If the installation is done right and the filter is placed above the oil sump so that the oil can drain, it is extremely easy to replace the filter element - and do it cleanly, without making a big mess.
 

Attachments

  • IMG_1523.jpg
    IMG_1523.jpg
    96.4 KB · Views: 42

RLENT

Veteran Expediter
Motor Guard Filter Element, Front

I have a Motor Guard M-30 on my plasma cutter up in the shop - this is a replacement Motor Guard filter element for it - looks familiar ..... other than being brown (...... guess the other stuff is white so ya can tell if need to keep on wipin' ..... or if you're really done ...... :eek:)

Motor Guard uses a polypropylene core in their filter elements - which makes them unsuitable for use in a hot lube oil system.
 

Attachments

  • IMG_1508.jpg
    IMG_1508.jpg
    96.8 KB · Views: 28

RLENT

Veteran Expediter
Motor Guard Filter Element, Rear

Backside of the label - notice the rating - down to 0.1 microns. The only real downside to using one of these setups on an internal combustion engine (particularly an EGR diesel) is you're gonna have to change the filter much more often that you would with a normal full-flow oil filter - simply because the filter element is catching alot more of the dirt in the fluid. No biggie tho' - it's real easy to do.

This filter is probably only suitable for smaller diesel engines, with a relatively small oil sump - although some have ganged multiple filters and run them in parallel (I have seen pictures of up to three units ganged together) One thing is for sure - compared with other systems, you can't beat the price of the elements ($1 or less :D)

On the filter for the engine oil (I have one on my transmission as well) I've been changing out the elements at around 3K miles - it has been suggested to me that I might be able to go longer. I need to do a check and observe a filter that has some miles on it for flow.

On the filter on the transmission, I currently have around 30K miles on the original filter element at this point - if I get somewhere warm I'll probably check it to see how it's flowing. My guess is that it may not need to be changed but once when I do the transmission service (every 60K miles)
 

Attachments

  • IMG_1509.jpg
    IMG_1509.jpg
    95.2 KB · Views: 24

Scott101

Seasoned Expediter
Re: Filter, Internal

Below is what the insides look like, along with the standard filter element that Ralph recommends :D

Very cool. Thanks for posting this.

I think I can see from the picture that you use non-quilted. Is quilted ok? Also, I can't tell... Is that 2-ply?
 

Moot

Veteran Expediter
Owner/Operator
When I was a kid a friend had a Ford Fairlane and a roll of toilet paper fit nicely in the filter element cover. That practice wasn't all that uncommon back then.
 

RLENT

Veteran Expediter
Re: Filter, Internal

Very cool. Thanks for posting this.
You're quite welcome. There's alot more to it .... I have some more photos that I was going to post .... but I got called @ 08:30 this morning with a load ...... so I had to stop for the the time being. I'll post the rest of them as I get a chance.

I think I can see from the picture that you use non-quilted. Is quilted ok? Also, I can't tell... Is that 2-ply?
I don't know about that specific roll - it came with the filter and I didn't really inspect it that closely before I put it into use.

The two recommended papers are Scott 1000 single-ply, and Kimberly-Clark 004460, which is the preferred of the two. The Kimberly-Clark, which I have not tried yet, is a two-ply, 500 sheet roll. I just picked up a case of it (80 rolls) from Fastenal last Friday and will see how it works.

The KC is a little shorter (4.1" vs. 4.5") than the Scott, and although both are supposed to be the same diameter (4.5") the KC appears to be slightly smaller. The recommendation is unroll roughly 40 full "wraps" from the Scott roll, and 10 full "wraps" from the from the KC before inserting the roll into the filter housing.

On the quilted aspect, I dunno ...... I've never really paid that much attention to TP ..... so I doubt if I'd know quilted by looking at it. I know that whatever the wife buys for the house is just fine (for non-filtration use :D) .... and I've let my wife know that she should just keep buying that. :rolleyes:

The Scott is easier to source - Walmart carries it. The KC is a little harder - it's more an Industrial/Institutional product - I think Office Depot sells it, although I've never found one that stocked it. Fastenal, which seems to have stores about everywhere, may stock it - the store I got my case from didn't have it in stock, but their warehouse, which was about a mile away had it.
 

RLENT

Veteran Expediter
When I was a kid a friend had a Ford Fairlane and a roll of toilet paper fit nicely in the filter element cover. That practice wasn't all that uncommon back then.
I've heard tell of it - it's interesting ...... I suspect that the reason the auto makers went away from it was probably due to wanting to be able to sell something which required much less maintenance - although it's really quick and easy.

Of course, the other aspect of it is the public relations angle and the (relatively) bad positioning and letting the competition push the fact that your vehicle uses toilet paper as a filter ..... "Egads Martha ..... say it ain't so ..... anything but that !"

In the bargain, they gave something which allows the oil to get dirty, and makes us do oil changes alot more often than would be needed otherwise.

Imagine if all cars were equipped this way from the factory - the amount of oil saved by being able to do extended oil change intervals would huge. Of course, the oil companies probably wouldn't be too excited about that.

The guy who I got these filters from, his philosophy could pretty much be summed up as "I don't mind changing a filter .... but I hate to change oil ...."

Works for me.
 

RLENT

Veteran Expediter
This is the mounting bracket I fabricated for the engine oil bypass filter. The bracket mounts at four points - the two vertical straps mount to the HVAC ducting/cabin air filter housing studs, the strap going to the left mounts to a tab with a hole in it on the body located near the water valve over by the blower motor housing, and the strap going to the right mounts to a hole I drilled in the "C" bracket for the windshield wiper motor mounting.

The various pieces were bolted in place on the vehicle and tack welded together and then the entire assembly was removed and fully welded.

This puts the filter directly over top the engine - pretty much right over the intake manifold, and slightly to the right of the black plastic injector valley cover, sort of tucked down between it and the EGR valve. The idea was to mount the filter where it was easily accessible and as high as possible - to ensure it would drain and could be changed without making a big mess.

The downside is that this assembly will have to be unbolted and dropped (about an inch) in order to change the cabin air filter. Thankfully, I've averaged around 60K miles on the cabin filters - so it's not like I have to do it that often.
 

Attachments

  • IMG_1556.jpg
    IMG_1556.jpg
    96.2 KB · Views: 36

RLENT

Veteran Expediter
In order to hook up an external filter one has to have a source of pressurized oil from the engine itself, or lacking that maybe a tap into the oil pan and an external pump. Typically, alot of bypass filter installations steal a pressurized feed from the oil pressure sender, by installing a tee fitting.

Can't do that on the OM 647 engine in the '06 and earlier T1N Sprinters - since oil pressure is not monitored in any way (there is an oil level sensor in the oil pan itself but it's unsuitable) and the engine is largely sealed - except for the feed and return lines going to the turbo - which generally aren't considered to be good places to tap (ya really don't want to do anything to reduce the oil flow to the turbo)

And while the newer NCV3 Sprinter with the OM 642 diesel does have an oil pressure sending unit, it is not threaded into anything (uses a different connection method - o-ring and bolts or screws) - despite what any parts or service manual may saw (they're incorrect.)

However, due to some diligent work on the part of an Amsoil direct jobber out of South Carolina, named Robert Bryan, all is not lost for T1N owners (and possibly NCV owners as well) - as he discovered that there was a (plugged) oil pressure test port on the right (driver's) side of the engine block, near the front, on the OM 647.

The port is very near the timing chain cover, and will be behind the AC compressor, if you vehicle is so equipped. Since the port is located so close to the timing chain cover, nothing but a straight fitting can be used (a 90° fitting will contact the timing case cover when you attempt to screw it in .... don't ask how I know this :rolleyes:)

Below is a photo of side fitting taken while on my back and looking up into the engine compartment - the AC compressor is on the left side of the image and the transmission cooler line and oil pan are on the right.
 

Attachments

  • IMG_1483.jpg
    IMG_1483.jpg
    94.9 KB · Views: 50

RLENT

Veteran Expediter
Like I said, I wasn't too keen on the paint job Ralph supplied on the filters. A little aircraft stripper and some Scotch-Brite pads took the offending paint off. These could actually look pretty trick if someone were to polish 'em up :eek: .... heheheh ..... yeah, sure they could ......

..... it ain't gonna be me though ..... :cool:
 

Attachments

  • IMG_1557.jpg
    IMG_1557.jpg
    96.8 KB · Views: 17

RLENT

Veteran Expediter
Got a little heavy with the primer ....... :rolleyes:
 

Attachments

  • IMG_1562.jpg
    IMG_1562.jpg
    92.9 KB · Views: 11

RLENT

Veteran Expediter
On the paint I used Duplicolor Ceramic Engine Enamel from Autozone, which is rated to 500°F.

Color-wise, for engine oil in a diesel, this just seemed "right" :D
 

Attachments

  • IMG_1571.jpg
    IMG_1571.jpg
    97.5 KB · Views: 21

RLENT

Veteran Expediter
For the ATF, this just seemed a little more appropriate :eek:
 

Attachments

  • IMG_1581.jpg
    IMG_1581.jpg
    96.1 KB · Views: 20

RLENT

Veteran Expediter
I ordered most of the fittings I used from Discount Hydraulic Hose (Discount Hydraulic Hose.com) because they have a great selection, good service, their prices are good, and the stuff was delivered right to my front door.

I settled on using steel JIC 37° flare fittings - this is a common industrial hydraulic standard, and the fittings are generally cheap and readily available at many locations. The fittings have a positive seal at the flare and cone, and are generally rated for pressures in excess of 2000 psi - so it's way overkill.

I don't like using NPTF (National Pipe Thread, Fuel) because the threads do dual duty - they make the mechanical connection and the seal - and are prone to leaking if over-tightened. Although it is still widely used, NPTF is a less reliable connection - so I avoid it wherever I can.

Below is an image of the fitting order from Discount Hydraulic Hose (which was for both the engine oil bypass and transmission projects) I had to make several more trips locally to source everything I needed.

The fitting with the caps on it at the bottom of the image was going to be the one that I used to tap into the oil pressure test port in the block of the OM647 engine - ultimately I was not able to use it because of a clearance issue.
 

Attachments

  • IMG_1488.jpg
    IMG_1488.jpg
    97.2 KB · Views: 39

RLENT

Veteran Expediter
I ended up deciding to use Summit Twist-Tite hose and fittings. The hose (and fittings) are essentially a knock off of Eaton AeroQuip Socketless Hose and Fittings. It's easy to work with and to cut to length and assemble onsite.

The hose is approved for oil & hydraulic and is rated to 250 psi @ 302° - which is plenty of safety factor for the intended application, at least as far as pressure and temp is concerned. The only real question is durability.

I probably should have used either stainless steel braided hose which is very durable (will chew up anything it comes in contact with ) or just had the local hydraulic shop build some hose assemblies using single-wire braided hydraulic hose.
 

Attachments

  • IMG_1496.jpg
    IMG_1496.jpg
    96.7 KB · Views: 9

RLENT

Veteran Expediter
Below are the Summit Twist-Tite fittings that will be used for the hose ends. They made from billet aluminum and are anodized a snazzy blue and red (not that I really care, one way or another) Summit lists them as "AN" fittings and they are apparently popular with gearheads and the showcar crowd. The "AN" means that they conform to the Army-Navy standard. They use a 37° flare and seat same as the JIC hydraulic fittings, and have the same threads.

The really neat thing about these is that when they are used with the proper hose (Summit Twist-Tite) they do not require hose clamps - the hose simply is inserted and then "twisted tight" - the only way you will ever get the hose off is by slitting it along the fitting - you will never pull it off (.... don't ask how I know this ..... :eek: )
 

Attachments

  • IMG_1518.jpg
    IMG_1518.jpg
    113.1 KB · Views: 13

RLENT

Veteran Expediter
This is a an Amsoil BP-89 swivel fitting, it's often used on engine oil bypass filter setups by installing it in the oil filler cap so that the return line from the bypass filter can be attached to the oil filler cap in order to provide a return path for the oil to get back into the engine. (The fact that it swivels allows you to unscrew the oil filler cap so that you can add oil)
 

Attachments

  • IMG_1519.jpg
    IMG_1519.jpg
    95.8 KB · Views: 21
Top